Enter what you are looking for!
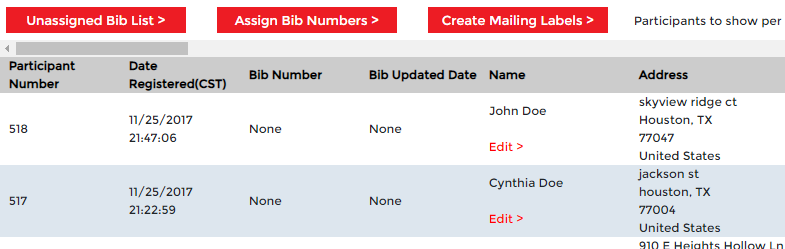
When you click on the PARTICIPANTS tab within EVENT SOLUTIONS, you will see a master list of all of your registered PARTICIPANTS, meaning everyone who has signed up for any one or more of your SUB-EVENTS. Here you will see all of the requested participant information from the registration.
If you have more than one SUB-EVENT listed on your event registration, then simply click on the SUB-EVENT for which you want to VIEW ONLY THIS SUB-EVENT PARTICIPANTS in the header row above the PARTICIPANTS tab.
Yes. Simply click on the PARTICIPANTS tab within EVENT SOLUTIONS. Then, select the SUB-EVENT (or you can download a master list) for which you want the spreadsheet, and click the DOWNLOAD SPREADSHEET button. Remember that our platform does a lot of the work for you, such as tallying T-shirt counts and such, in the My Financials feature.
Indeed you can. Simply click on the PARTICIPANTS tab within EVENT SOLUTIONS. Then, select the SUB-EVENT for which you want the MAILING LABELS, and click the CREATE MAILING LABELS button and complete the required information.
Click on the PARTICIPANTS tab within EVENT SOLUTIONS. Then, select the SUB-EVENT for which you want to ASSIGN BIB NUMBERS, then click on the ASSIGN BIB NUMBERS button. This feature allows your event timing company to pre-assign bib numbers while online registration is still active. Using the DYNAMIC REGISTRATION feature in combination with this allows you to keep online registration open until just before the event starts. Step 1: Download the PARTICIPANTS spreadsheet. Step 2: Enter the BIB NUMBERS into the bib number column. Step 3: Upload the modified spreadsheet with the new BIB NUMBERS added. Note: While sorting the entries in the spreadsheet, do not change the position of the first two rows; and, if you want to add any new column, please add it on the far right.
Issuing refunds is solely at your discretion. Remember that registration fees can be refunded; however, processing fees cannot be refunded via our system.
To issue a refund,
Login to your account and click on the "Participants/Results" link under "Event Solution" tab. View Screenshot
Select your event from the event dropdown here and click on "Participant link". View Screenshot
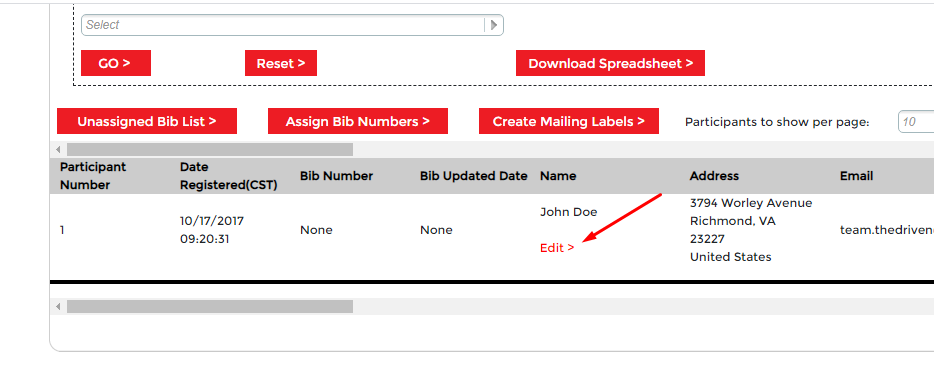
On this page you will find the "Edit > " link for each participant name. View Screenshot
These links contain all options for refunds, delete or defer participants. View Screenshot
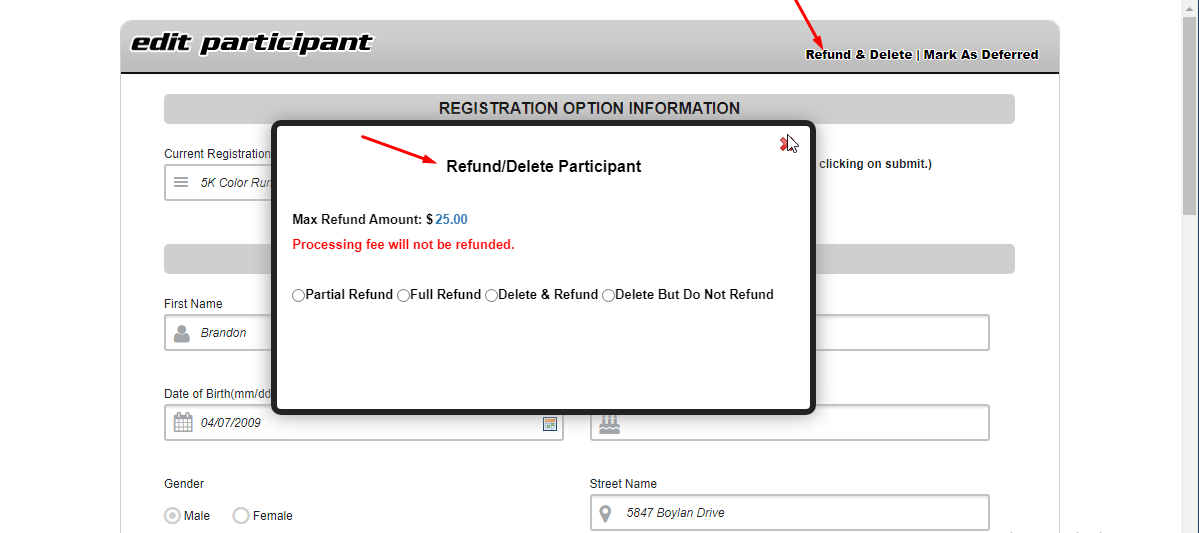
1) Refund/Delete Participant >> Here you can process full or partial refund to participants. With option if you want to keep that participant in the list or need to delete. View Screenshot
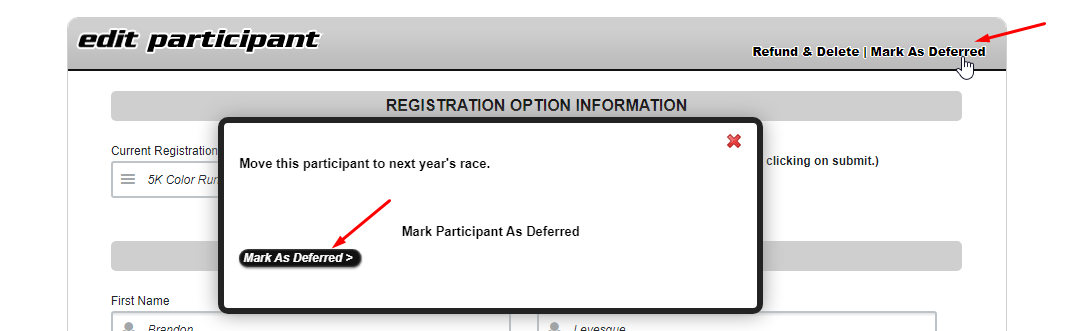
2) Mark Participant As Deferred >> If you don't want to process refunds now, but need to give some kind of exemption to these participants for your next event (like allow them with some discounted price Or allow them to participate without registration to the next event ), you can consider this option. View Screenshot
Because the majority of our costs are related to the online transaction, The Driven is unable to issue refunds for our fees. However, you will still receive the event fees for every participant. We encourage you to prominently display your refund policy on your event website.
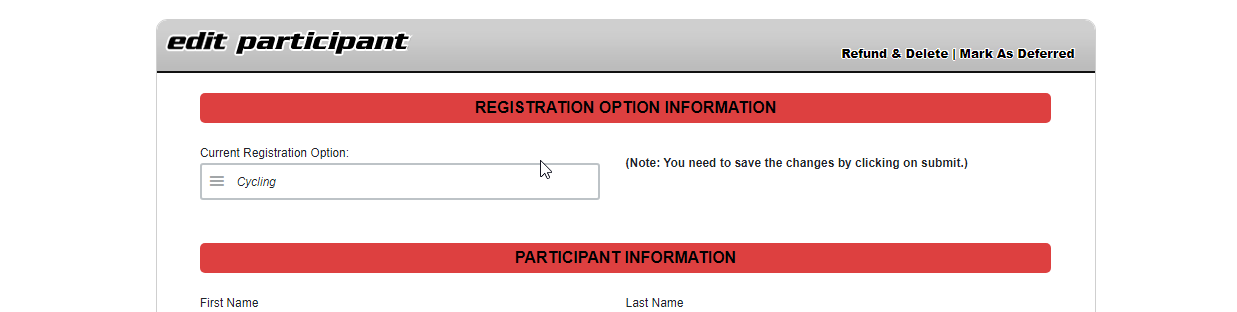
In the "Participants/Results" section under EVENT SOLUTIONS, select "Edit" under the name of the PARTICIPANT you wish to EDIT. View Screenshot
Then, EDIT the details you wish, being sure to click the SUBMIT button to finalize the changes.
This feature makes it easy for you to switch PARTICIPANTS from one registration option to another. View Screenshot
Yes. Click on the RESULTS button in the PARTICIPANTS section of EVENT SOLUTIONS. Select the SUB-EVENT for which you want to integrate RESULTS. From there, you will select whether you want to UPLOAD INDIVIDUAL RESULTS, DELETE RESULTS, or UPLOAD PRE-FORMATTED RESULTS FILE (such as from a TIMING COMPANY).
Please follow the below steps to do so,
1. Login into your account
2. Select the correct event from the drop-down menu View Screenshot
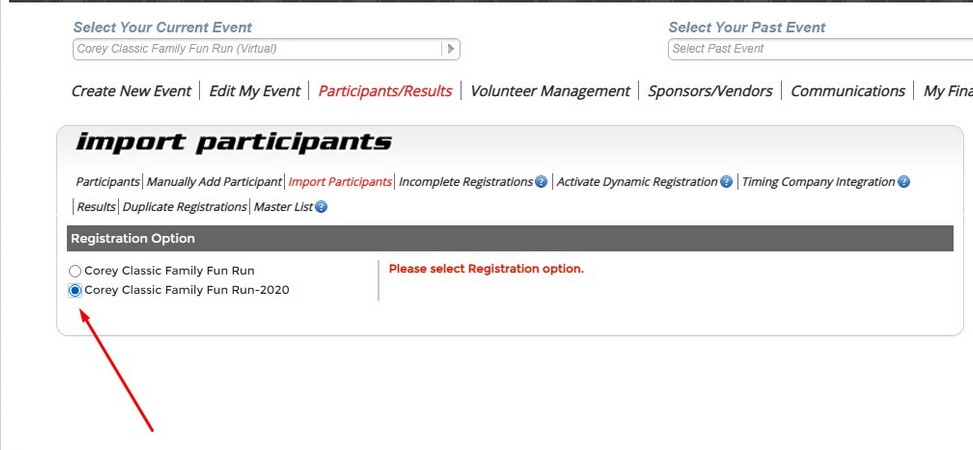
3. Click on Import participant View Screenshot
4. Select the correct registration option View Screenshot
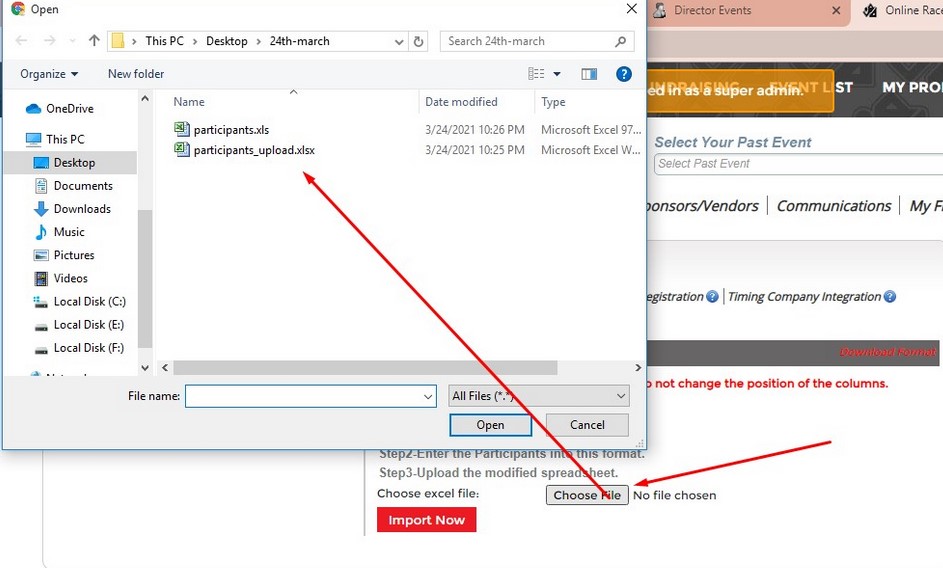
5. Download the demo excel and maintain all the sequences given in the excel file. View Screenshot
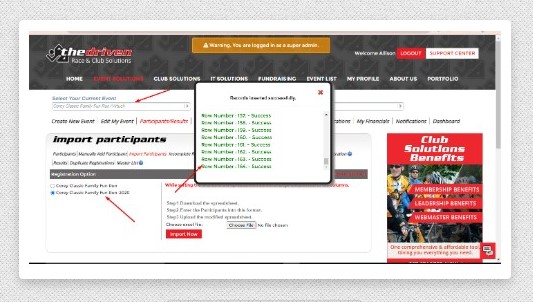
6. Click on choose file and select the participant excel sheet as per downloaded format and then click on the Import Now button. View Screenshot
7. If the participant imported successfully then you will get a successful window. View Screenshot
Please follow the below steps to do so,
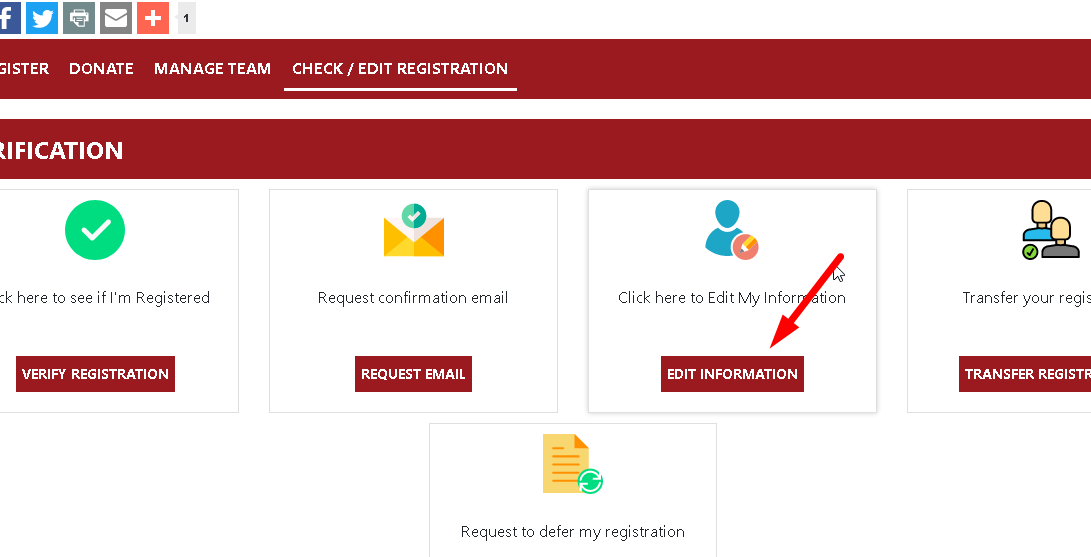
1. Under the page "CHECK / EDIT REGISTRATION" click on the " Edit Information" View Screenshot
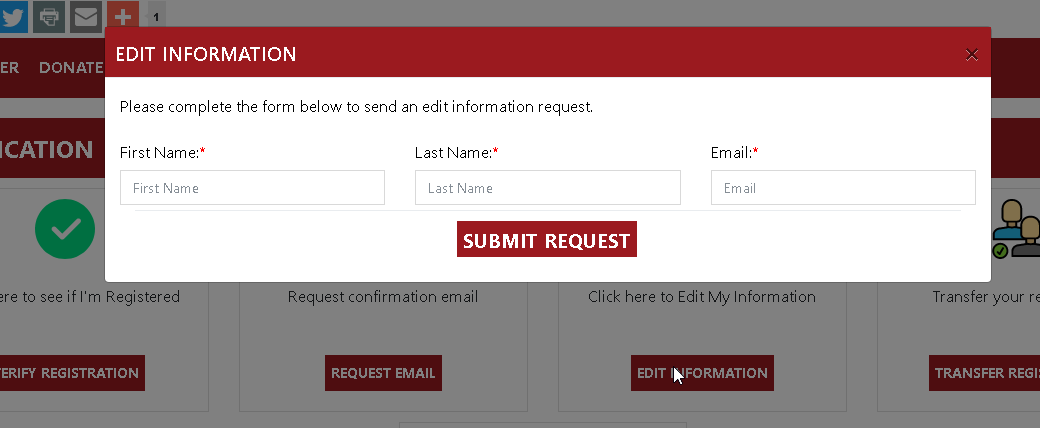
2. Enter the First name, Last name & email that you used to register in the event View Screenshot, View Screenshot
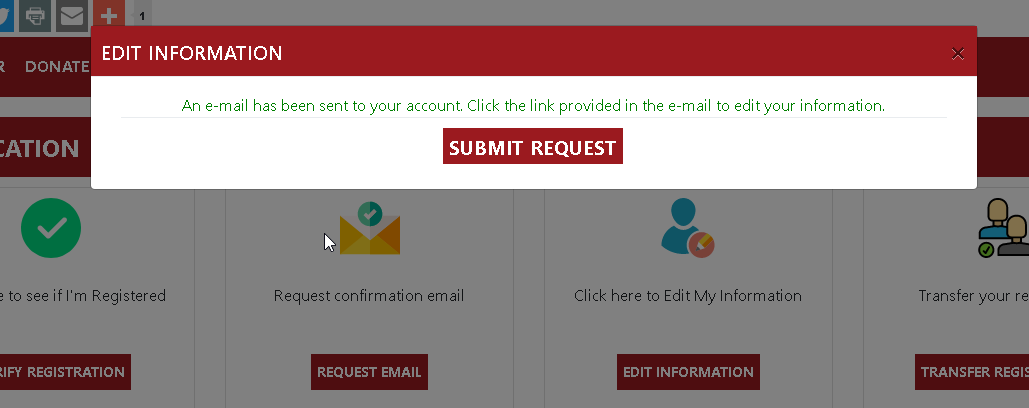
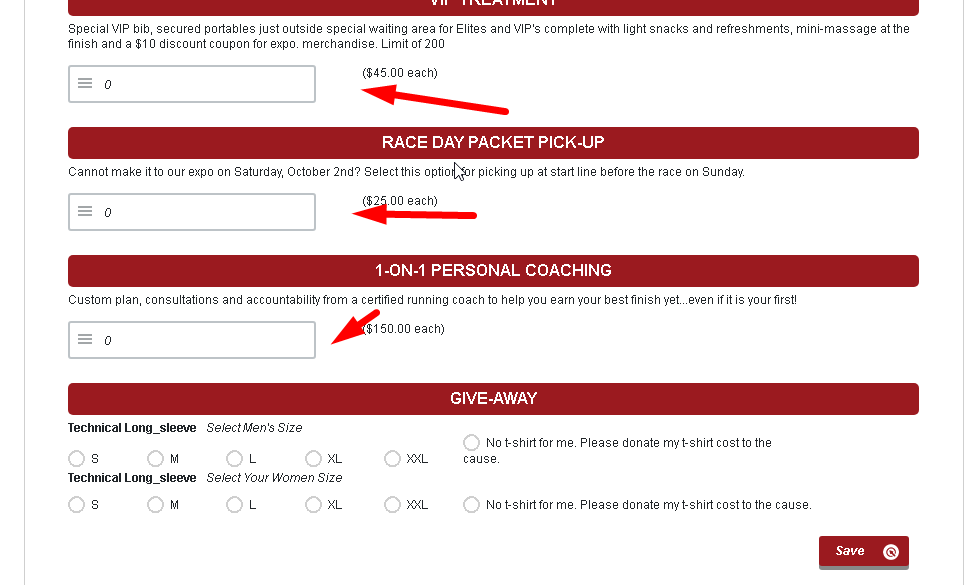
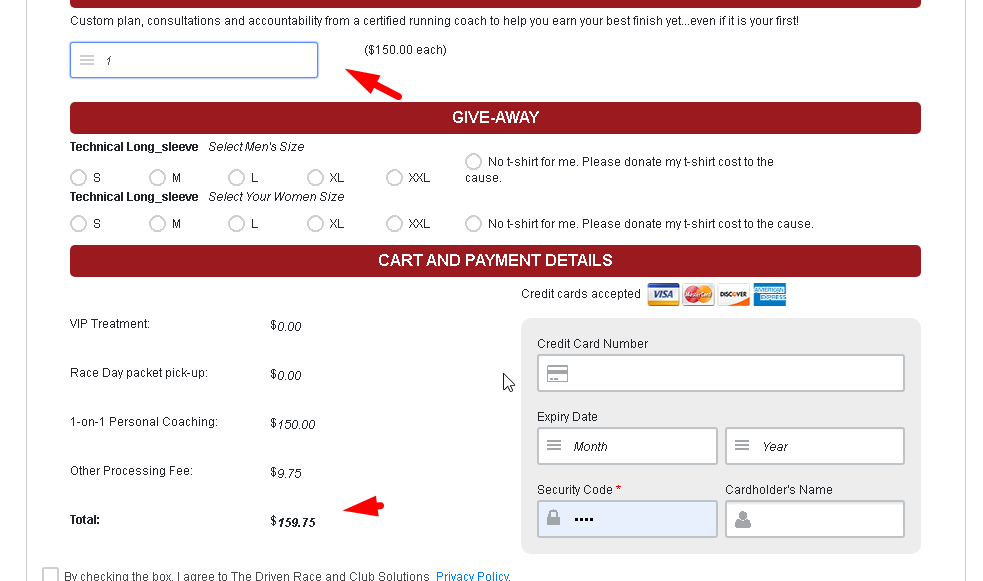
3. You will receive an email with a link to edit your information. On this page you can purchase the additional tickets View Screenshot, View Screenshot
Please follow the below steps,
1. Login to your event director account https://thedriven.net/site.login
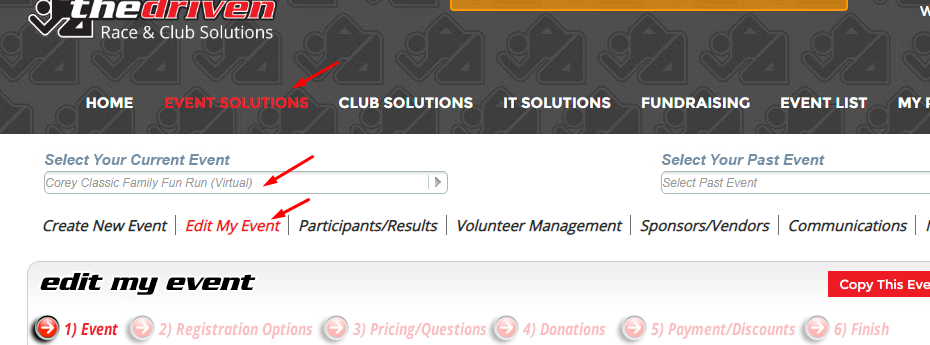
2. Select the event from event dropdown and click on "Edit My Event" tab. View Screenshot
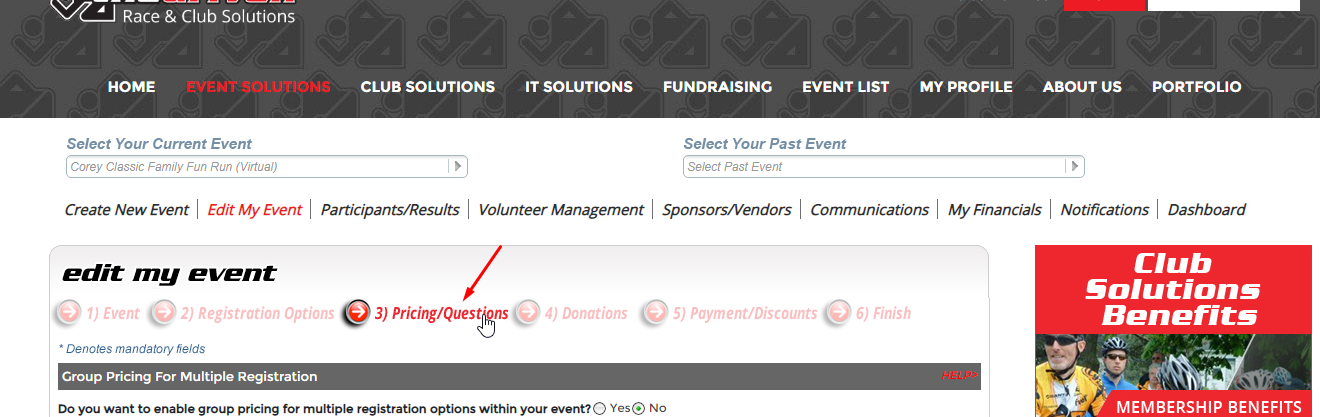
3. Click on "Pricing/Questions" View Screenshot
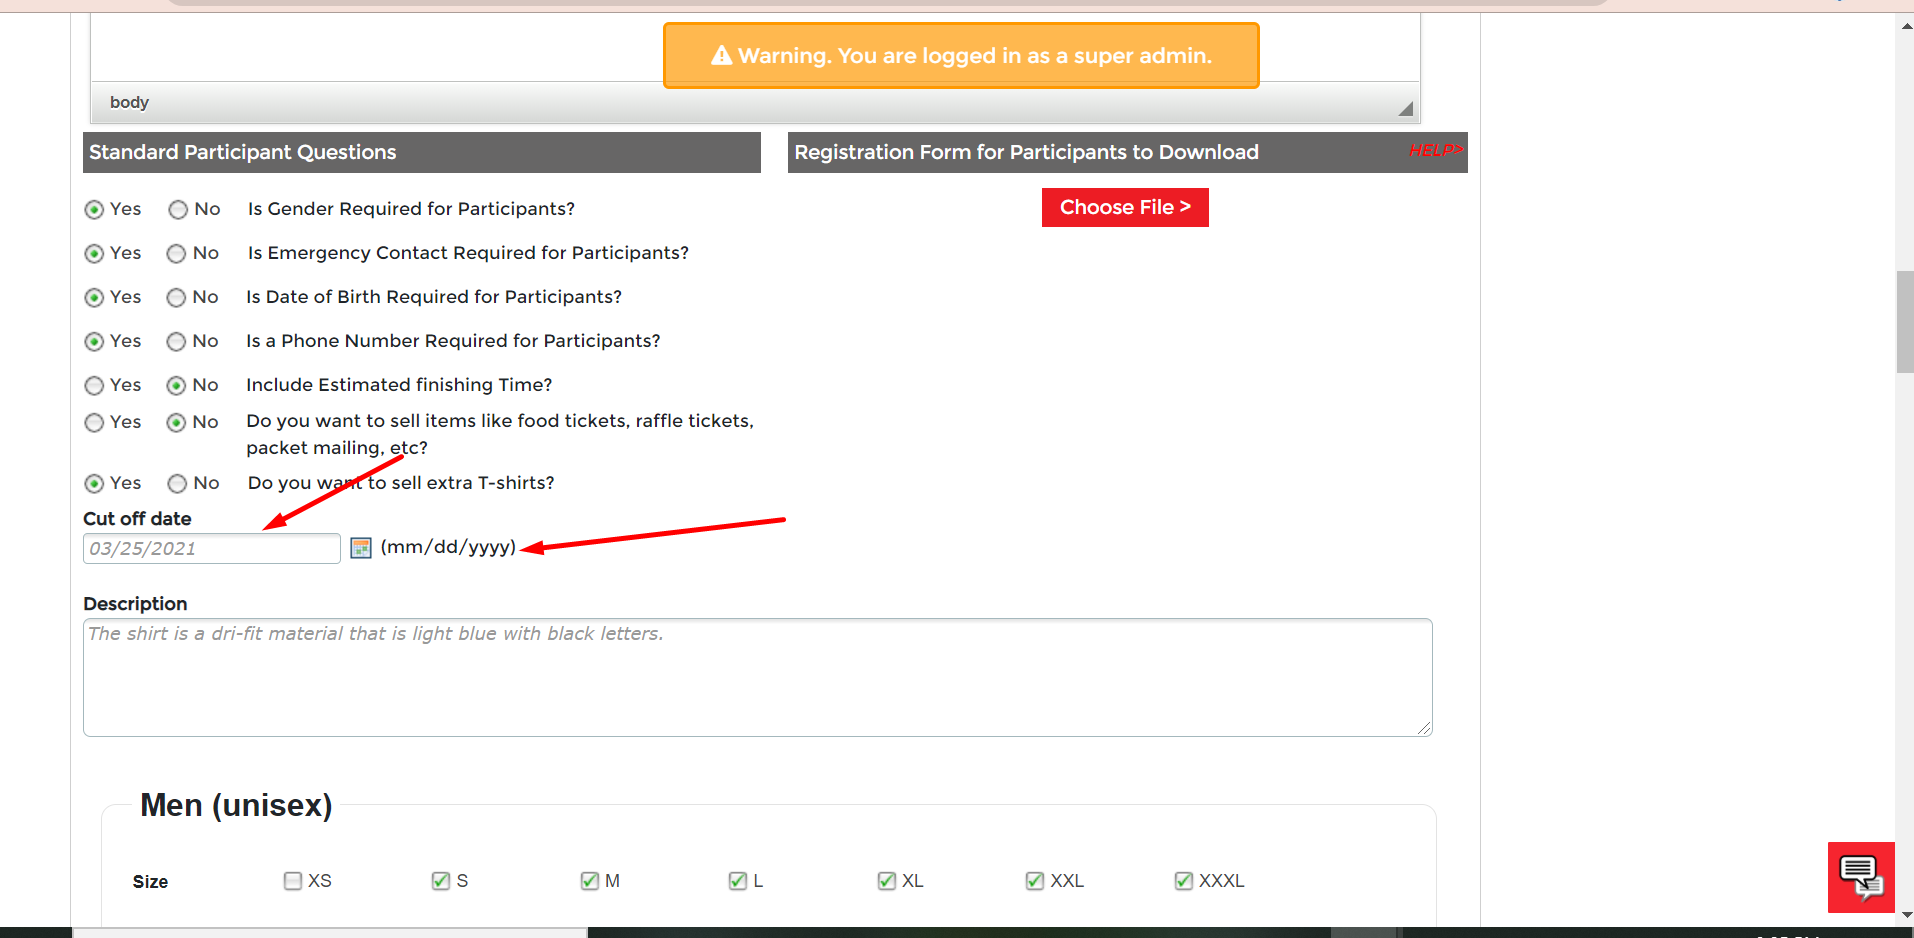
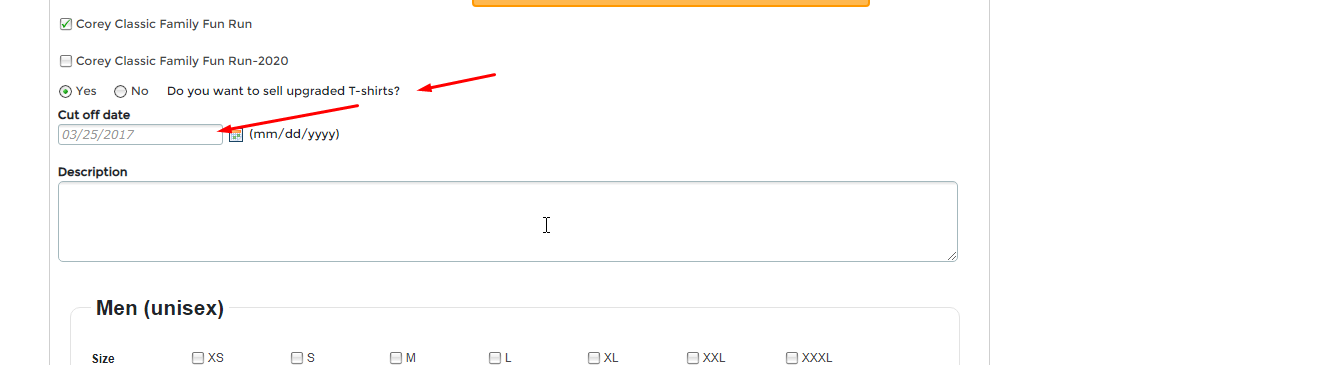
4. Change the cutoff date as per your requirement and click on the SAVE button at the bottom of the page. View Screenshot, View Screenshot, View Screenshot
Please follow the below steps,
1. Login to your event director account
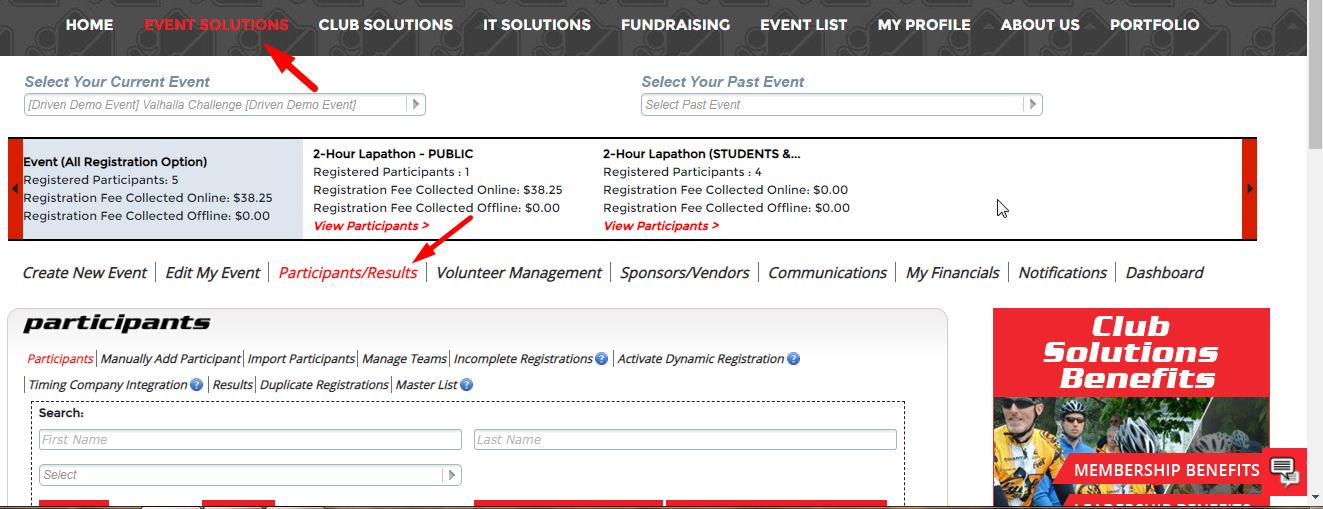
2. Click on the "Participants/Results" link under "Event Solution" tab View Screenshot
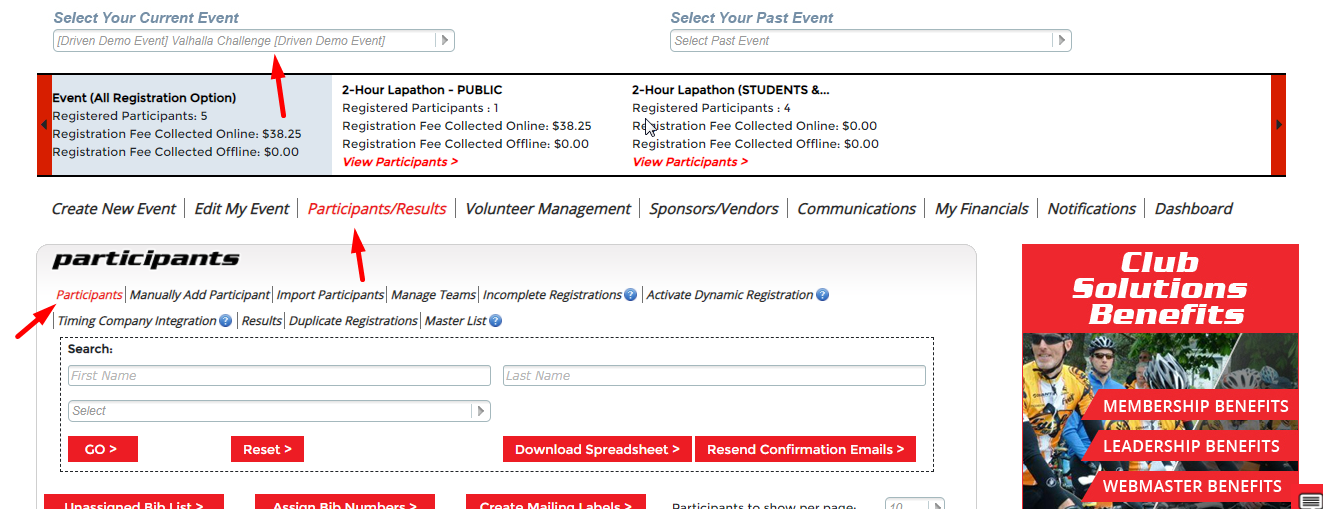
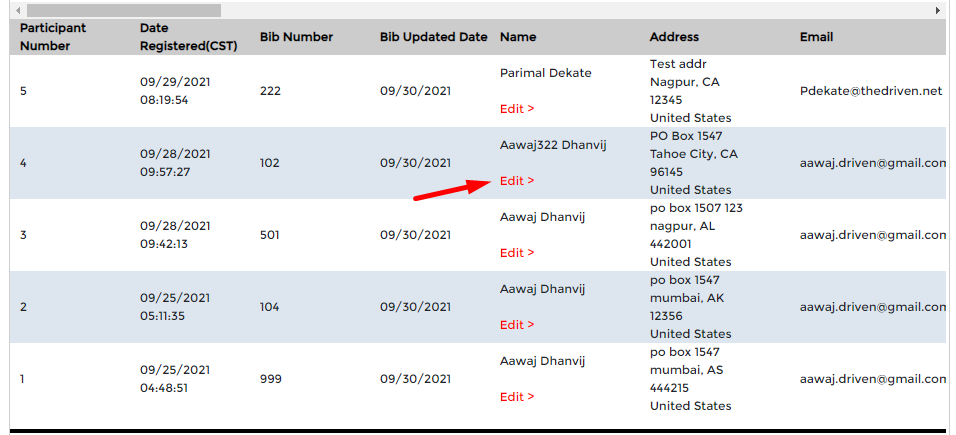
3. Select your event from the event dropdown here and click on the "Participant link" View Screenshot
4. Find the participants and click on the Edit button View Screenshot
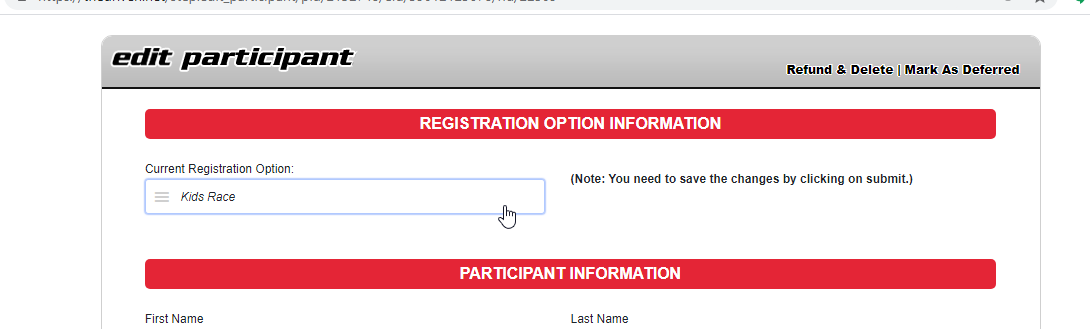
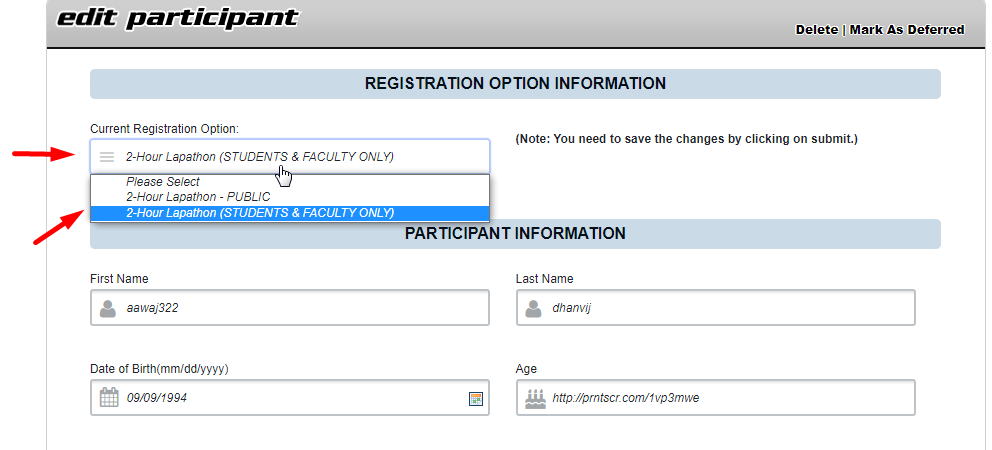
5. Click on the current registration dropdown and select the race where you want to move the participants View Screenshot
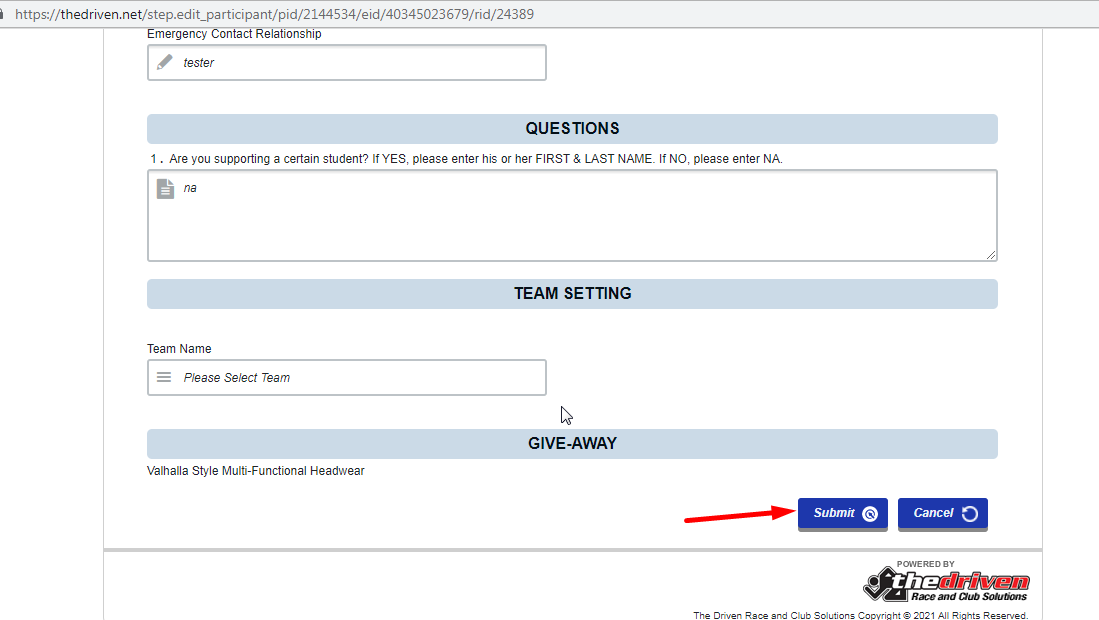
6. After selecting the race scroll down the page and click on the Submit button View Screenshot
When you click on the PARTICIPANTS tab within EVENT SOLUTIONS, you will see a master list of all of your registered PARTICIPANTS, meaning everyone who has signed up for any one or more of your SUB-EVENTS. Here you will see all of the requested participant information from the registration.
If you have more than one SUB-EVENT listed on your event registration, then simply click on the SUB-EVENT for which you want to VIEW ONLY THIS SUB-EVENT PARTICIPANTS in the header row above the PARTICIPANTS tab.
Yes. Simply click on the PARTICIPANTS tab within EVENT SOLUTIONS. Then, select the SUB-EVENT (or you can download a master list) for which you want the spreadsheet, and click the DOWNLOAD SPREADSHEET button. Remember that our platform does a lot of the work for you, such as tallying T-shirt counts and such, in the My Financials feature.
Indeed you can. Simply click on the PARTICIPANTS tab within EVENT SOLUTIONS. Then, select the SUB-EVENT for which you want the MAILING LABELS, and click the CREATE MAILING LABELS button and complete the required information.
Click on the PARTICIPANTS tab within EVENT SOLUTIONS. Then, select the SUB-EVENT for which you want to ASSIGN BIB NUMBERS, then click on the ASSIGN BIB NUMBERS button. This feature allows your event timing company to pre-assign bib numbers while online registration is still active. Using the DYNAMIC REGISTRATION feature in combination with this allows you to keep online registration open until just before the event starts. Step 1: Download the PARTICIPANTS spreadsheet. Step 2: Enter the BIB NUMBERS into the bib number column. Step 3: Upload the modified spreadsheet with the new BIB NUMBERS added. Note: While sorting the entries in the spreadsheet, do not change the position of the first two rows; and, if you want to add any new column, please add it on the far right.
Issuing refunds is solely at your discretion. Remember that registration fees can be refunded; however, processing fees cannot be refunded via our system.
To issue a refund,
Login to your account and click on the "Participants/Results" link under "Event Solution" tab. View Screenshot
Select your event from the event dropdown here and click on "Participant link". View Screenshot
On this page you will find the "Edit > " link for each participant name. View Screenshot
These links contain all options for refunds, delete or defer participants. View Screenshot
1) Refund/Delete Participant >> Here you can process full or partial refund to participants. With option if you want to keep that participant in the list or need to delete. View Screenshot
2) Mark Participant As Deferred >> If you don't want to process refunds now, but need to give some kind of exemption to these participants for your next event (like allow them with some discounted price Or allow them to participate without registration to the next event ), you can consider this option. View Screenshot
Because the majority of our costs are related to the online transaction, The Driven is unable to issue refunds for our fees. However, you will still receive the event fees for every participant. We encourage you to prominently display your refund policy on your event website.
In the "Participants/Results" section under EVENT SOLUTIONS, select "Edit" under the name of the PARTICIPANT you wish to EDIT. View Screenshot
Then, EDIT the details you wish, being sure to click the SUBMIT button to finalize the changes.
This feature makes it easy for you to switch PARTICIPANTS from one registration option to another. View Screenshot
Yes. Click on the RESULTS button in the PARTICIPANTS section of EVENT SOLUTIONS. Select the SUB-EVENT for which you want to integrate RESULTS. From there, you will select whether you want to UPLOAD INDIVIDUAL RESULTS, DELETE RESULTS, or UPLOAD PRE-FORMATTED RESULTS FILE (such as from a TIMING COMPANY).
Please follow the below steps to do so,
1. Login into your account
2. Select the correct event from the drop-down menu View Screenshot
3. Click on Import participant View Screenshot
4. Select the correct registration option View Screenshot
5. Download the demo excel and maintain all the sequences given in the excel file. View Screenshot
6. Click on choose file and select the participant excel sheet as per downloaded format and then click on the Import Now button. View Screenshot
7. If the participant imported successfully then you will get a successful window. View Screenshot
Please follow the below steps to do so,
1. Under the page "CHECK / EDIT REGISTRATION" click on the " Edit Information" View Screenshot
2. Enter the First name, Last name & email that you used to register in the event View Screenshot, View Screenshot
3. You will receive an email with a link to edit your information. On this page you can purchase the additional tickets View Screenshot, View Screenshot
Please follow the below steps,
1. Login to your event director account https://thedriven.net/site.login
2. Select the event from event dropdown and click on "Edit My Event" tab. View Screenshot
3. Click on "Pricing/Questions" View Screenshot
4. Change the cutoff date as per your requirement and click on the SAVE button at the bottom of the page. View Screenshot, View Screenshot, View Screenshot

